Showing posts with label DIY Activities. Show all posts

Friday, May 24, 2013

Cheap Ideas for Speech by Miss Speechie!!


Cheap Ideas & Tricks for Speech!

Are you wondering how to use items around your house or items you can get for free in speech??  I have gathered a couple of items to show you how you can easily create multiple speech and language activities without spending a dime!

Brown paper lunch bags:

Do you have some of these in your house?  If not, you can easily get a TON for a cheap price that can last a while!  Here are some ideas that I use paper bags for:

  •  Puppets!  You can make puppets as a following directions activity or have students tell you how to make them for a language or fluency lesson.  You can also pre-make them to use for articulation, following directions, or pretend play.  You can also create character puppets based on stories read to help work on comprehension and describing.
  • Paper bag books:  Click HERE to see my previous post on how to create a book with these bags!
  • Sorting: You can easily create a sorting activity where students can place items into each bag. 
  • Mystery Bags:  You can place items into the bag and have students guess them by feeling or asking question.
  • Main Idea Bags:  You can put a main idea on the bags and provide students with magazines.  They can look for pictures that will go best with that main idea.


Cups:

Do you have these around the house?  If not, you can also get these for a cheap price!  Here is some ideas on how I use them:
  • Sorting:  an easy way to get students to sort by categories.
  • Following directions:  if you align and number the cups in the correct order of steps necessary to accomplish a task and provide the materials needed for each step in the cup, it will help student complete tasks independently.
  • Token holder for reinforcers!
  • Avoid grabbing and fighting:  when I am doing following directions tasks that contain crayons/markers/manipulatives, I like to have ready to go cups with the materials sorted for each student.  This helps avoid students fighting for materials!


Paint Stirring Sticks:

These were free!!  I went into a paint store and told them that I am a teacher and they handed me several!  Yes, FREE!  How do I use these?

  • Story sequencing:  I attach Velcro to the sticks and students can arrange pictures to tell or retell a story. 
  • Articulation/Phonological Awareness activities:  I take a permanent marker and write B, M, E.   As I say words, I ask students to touch the placement of the target articulation sound or where the sound is in the CVC word.  You can also use these B, M, E for teaching story sequences as well!
  • Word/Picture matching:  I attach Velcro to the stick.  Then, attach pictures on the Velcro.  I write words/synonyms/adjectives/etc. on clothes pins and students must match and place the clothes pin onto the correct picture based on the task.


McDonald’s French Fries Containers:

These were free as well!  Again, I pulled the teacher card!  It worked!!  Here are ways I use them:

  • Sorting: anything to motivate sorting activities works for me!
  • Sequencing:  students can place pictures or sentences into an order of the containers.
  • Answering questions:  I will make questions on yellow construction paper and place them into a container.  Students must take one, read and answer the questions.  Just an easy way to make a drilling activity more exciting!  Click HERE to see my blog post and more pictures using this idea!


Here are just four items I use in my therapy room!  There are tons more!  Feel free to visit my blog for ideas and suggestions on how to create DIY activities for your speech room.

Miss Speechie is a licensed speech-language pathologist and author of the blog, Speech Time Fun.  Learn more about Miss Speechie and her therapy ideas by visiting her blog, her Facebook page, Twitter, Pinterest, and Teachers Pay Teachers store!

Sunday, May 12, 2013

Ideas for Fluency Therapy by Jenn @ Crazy Speech World

I am so excited to be guest posting for Kristine to celebrate BHSM!  Thanks for having me!  I'm gonna share with you some ideas for fluency therapy!

Fluency disorders seem to be cyclical for me...some years I have very few and some years I have a TON!  This year has definitely seen a rise in fluency numbers on my caseload....mostly in my primary grades.  I have had to scramble to update some fun activities to work on building their confidence and fluency...favorite so far?  Turtles and bunnies!
I know many of us use a turtle image for representing slow, steady speech and the rabbit for bumpy, fast speech, so they were the perfect candidates.  I originally just had the turtles, but my SLP buddy Steph suggested the bunnies and it was such a great addition!  I found these cute guys over at My Cute Graphics.  You can grab the turtle HERE and the bunny HERE.  These are free graphics!  She also has color versions available, but I just copied them onto green and yellow paper.  I made 20 turtles and 10 bunnies.  So now are you asking what in the world am gonna do with these, Jenn???  Don't worry, I got some ideas too!
First, I made a trail of turtles and bunnies in my room, taped to the floor.  Then, the kids will go roll a dice and move around the circle, practicing the type of speech they land on.  I either give them the word, phrase, or sentence to say since most of them are not readers yet OR show them a picture card if they need less modeling support.  This is so great for getting them up and moving!  They love it!  

I know many of you may not be able to utilize the walking around due to space constraints (closet therapy, anyone?) so you could also put them in a box or bag and have students draw one at a time to practice the same way.

What else can you do with these graphics?
  • Use the bunny to represent bouncing and/or turtle for easy beginnings and practice those specific strategies 
  • Glue pictures or write questions on the back to practice spontaneous productions using fluency strategies
  • Add points values to each one and if students use the targeted strategy effectively, they keep the animal...whoever collects the most wins!
Can you think of any other ways to use this activity?  I would love to hear your ideas!

Jenn is a school SLP in Florida, working with children PK to 8th grade, and the author of the blog Crazy Speech World.  You can also follow her on Facebook, Twitter, Pinterest, and TPT.


Thursday, May 2, 2013

DIY Articulation Activities by Simply Speech

Here we go!! The first guest blogger of BSHM is Kristin from Simply Speech.  She has some amazing articulation activities to share with all of you.  A huge thank you to Kristin for sharing her ideas with all of my followers.  Keep reading, I hope you enjoy!!!

DIY Articulation Activities!

It’s no secret, I love articulation sessions. In grad school, everyone dreaded the boring artic clients… I wanted them! The reason I love working with kids that have articulation disorders is that there are SO many options for therapy activities. Sure, you could spend a small (or large) fortune on materials. It’s easy to do so after browsing the catalogs of great speech and language companies or TpT! But thank goodness that a little thing called Pinterest has come into our lives. Pinterest has motivated me to become a more crafty therapist. I wanted to share with you a few of my go-to DIY articulation therapy activities that I frequently use in my sessions.


 I learned about these while in my internship and I frequently make more! The photo above is of a game I used from copying shape templates. The Ellison Die Cut Machine at work also works great for cutting out shapes.  I made some copies, colored, laminated, cut, wrote some points on the back and BAM! therapy game completed! I have my students practice a target 3times, then they choose a piece from the pile. At the end, the kids add up their points or count how many pieces they acquired during the game. They love these silly games and I get a lot of opportunities for speech productions.


I love having the kids create fun activities that I can use as decorations for my speech room. We created a beautiful and colorful articulation garden! With a little "pinspiration," I picked up some paint chips from Home Depot. I pre-cut the paint chips into petals to save on time. During our group, I had the kids think of words that contained their targets and write them on the flower petals. In the center of the flower, I used tissue paper scraps that I had leftover from another similar activity I did during Christmas. There are so many things that you can create from paint chips!


This is my fabulous game I like to call KABOOM! It is made from an empty oatmeal container, pretty duct tape, and popsicle sticks... doesn't get much fancier than that! I got the inspiration from one of our first grade teachers that plays a similar game with her sight words. So of course my "speechie brain" insisted that I create an articulation version for my students. 

Here is how you play:
1. Write target words on popsicle sticks.
2. Make some *KABOOM* sticks (I made 4)
3. Put all the sticks in the container.
4. Have students take turns choosing 1 stick out of the container. If they say the word correctly, they keep their stick, if they say it incorrectly, they put it back in the container.
5. If a student picks a *KABOOM* stick, they put all their sticks back! (I also make they shout KABOOM :)
Disclaimer: This game is never ending... but you sure get a ton of artic practice!!

About once or twice a year, I like to let the kids make their own speech books. They always enjoy pulling out the crayons and making their own personalized book. The great thing about this activity is that it works for any level that the child is at in speech (word, sentence, or conversation) and it really emphasizes carryover because they love to share their book. I have found that speech books really make the students very aware of their speech sound goals they are working on. To make the books, I use the large index cards and crayons. I prompt students to think of words that contain their target sound. Usually they are pretty good with this because we practice target words all the time. But some need some help, so a brainstorming list of target words is helpful too. Depending on the level of the child, have them write the word or make up a sentence for the word and illustrate a picture. On the last page of the book, I add an autograph page. Students love getting their teachers and friends to sign their book after they have read it to them. This is awesome for carryover and homework!

I hope that these ideas give you a little inspiration and bring in some new ideas to your speech room! Please check out Simply Speech for more ideas….Happy BHSM!


Kristin Cummings is a school based and private speech language pathologist from St. Petersburg, FL. She is also the author of the Simply Speech blog. You can contact Kristin via email at: kcummingsslp@yahoo.com or facebook at: https://www.facebook.com/pages/simply-speech/359477697406777

Wednesday, April 17, 2013

Articulation Flowers!

Here in NJ we are finally getting nice, warm weather!  It is actually starting to feel like Spring.  The beautiful weather has inspired me to create some new activities for the speech room.  The first one I want to share with you is articulation flowers.  
Here is what I used for this activity:
Different colored die-cut flowers, construction paper, glue sticks, articulation pictures (according to your student's goals), and crayons.


Above are two of my students working on their adorable articulation flowers.  I gave them 3 pages of pictures with their speech sounds and had them choose around 10 pictures.  They chose to color their pictures.  My students each glued 5 of the die-cut flowers on a piece of construction paper.  Next, they each cut out all of their pictures.  They glued some of the articulation pictures in the center of the flowers and the rest all over the paper.  
Here are some of the finished projects!  I think they came out absolutely adorable.  Such a cute project for spring!!  I hope you can use this idea in your very own speech room.

Kristine 
Live Love Speech


Tuesday, April 2, 2013

Fun and Creative Spring Activities!!!

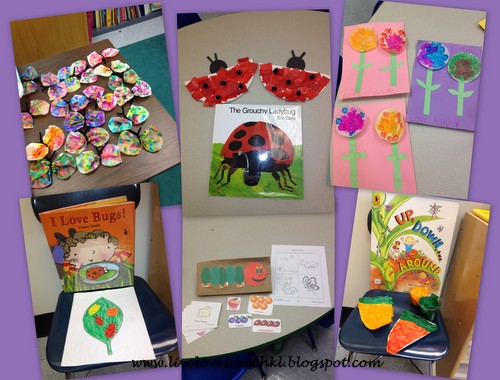
I hope you all enjoyed or are currently enjoying your Spring Break!  As always, it went by way too quickly for me; however, I am excited about some of the upcoming spring activities I have planned for my students.  Scroll down to see what supplies are needed and how to make each project seen in the picture!  Hopefully you will be able to use some of these activities in your own speech room or classroom.


Watercolor Butterflies

Supplies needed:  
Coffee filters, pipe cleaners (cut in half), "do a dot" stampers, water bottle, disposable tin trays, and paper plates.


How to make:  
You have probably seen several different versions of this project on Pinterest.  I believe that is where I found the idea last year and just changed things slightly.  First, each student should get a paper plate and coffee filter.  Have the students flatten their coffee filter as best as possible on top of the plate.  Next, I allow the students to take turns choosing "do a dot" colors (approximately 4) and start stamping away!  Remind students to cover as much "white" with color as possible to make for a beautiful/colorful butterfly.  You may need to help your students with this next step.  Carefully pinch the center of the coffee filter and slide on half of a folded pipe cleaner.  Once in place, twist the pipe cleaner 2 or 3 times and separate the ends to look like antennas.  Once the little butterfly is formed, students place them in a disposable tin.  Next is the fun part!  Students take turns using the water bottle and gently spray their butterflies to start blending the colors together.  *Be sure you supervise the last step and make sure the coffee filters do not get too drenched!* 

Here are some of my last year student's butterflies hanging up!  They turned out absolutely adorable!

I Love Bugs!

Supplies needed:  
Any "buggy" book (last year I chose to read I Love Bugs! by Emma Dodd), printable leaf or leaves, crayons, different shaped foam pieces, and glue.  
How to make:  
Each student gets a "leaf", 4 or 5 foam pieces, crayons, and glue.  Students should color their leaf and glue on their foam pieces.  Next, they should make their foam pieces look like "bugs" by drawing stripes, spots, faces, legs, etc.  That's pretty much it!  Super simple and super cute!

Ladybugs

Supplies needed:
Paper plates (cut in half), black pom-poms (small or large), circles and strips cut out of black construction paper, shredded pieces of red tissue paper, glue, and any "ladybug" book (I chose The Grouchy Ladybug by Eric Carle).
How to make:
Each student will glue on pieces of red tissue paper to cover as much white as possible.  Next, flip the plate over and glue on the circle and 2 strips to make it look like a head and antennas.  Once that is done, flip it back over and glue on a few black pom-poms to look like the ladybugs spots.  Last year a few of my students glues on a few black strips around the sides of the plate to look like legs as well.  

Mother's Day (or just for Spring) Flowers

Supplies needed:
Cupcake liners, "do a dot" stampers, construction paper, paper plates, green strips (for stems), green "leaves", crayons, and glue.

How to make:  
This project is similar to the butterflies mentioned earlier minus the spray bottle.  Each student will stamp two cupcake liners (these will be the tops of the flowers).  Next, they will glue on two long strips of green paper (as the stems) and leaves.  *I free handed the leaves but feel free to trace and cut out if you would like*  The tops of the flowers get glued on top of the stems.  Finally, students can address their flowers to whomever they would like (mom, grandmom, sister, etc.).  You can certainly eliminate the personalized part and just use this project as cute spring flowers!

Thanks for checking out these spring activities.  I'd love to hear from you if you use any of them in your own classroom or speech room.  


Wednesday, March 20, 2013

Spring Activities and a {FREEBIE}

I am so excited that next week is my spring break!!  I have lots and lots of plans including SHOPPING, RELAXING, BLOGGING, and MAKING NEW ACTIVITIES!  Oh did I mention, SLEEPING IN?!  I couldn't be more excited about that last one.  Be sure to read all the way to the end of this post for a BRAND NEW FREEBIE!

I wanted to share with you all what we have been doing this last week before break in the speech room!
First, my students have been reading another one of the awesome "Old Lady" books.  They absolutely love taking turns reading and always laugh at all the silly things the old lady swallows in the book.  Last year, I found these free printables below (I can't remember from where but if you search for them on Google, I'm sure you can find them).  We used them with the story in order to work on sequencing skills!

Next is my favorite activity of the week!  I have been using it with my articulation and language kiddos.  My articulation groups have been getting 8 blank eggs and a basket.  Each student writes words that have his/her speech sound.  Next, they get to color and decorate the eggs and basket.  Finally, all the eggs get glued on the basket.  The best part about this cute little craft is it can be used as CARRYOVER!  My language groups have been getting sheets with the patterned eggs.  As they work on coloring and getting crafty, I go around to each student and work on various goals (i.e. "wh" questions, following directions, inferences, etc.).    I will post pics of all the amazing Easter egg baskets my students have made soon!!

Some of my older students have been doing the "spring" word search that I found here ~~> http://www.bogglesworldesl.com/spring.htm


Finally, we have been playing my TWO newest activities:  Easter Monster Name Game and Easter Eggs Reinforcer Game {FREEBIE}.  You can find all the information on BOTH activities at my TpT store.

Last but not least, here is my newest FREEBIE, Spring Questions!  You can grab it HERE!


Friday, March 8, 2013

{Guest Blog} Thrifty SLP Ideas by Speechy Musings!


I am so excited to share this AMAZING guest blog post created by Speechy Musings!  She has come up with great ideas to use in therapy while not spending a ton of money!!  What can get better than that?!  Read on to hear all of her great ideas....
How many of you are on a tight budget when it comes to materials for your speech room? I don’t yet have my own speech room, but I’m in graduate school I definitely understand the need to plan creative, motivating therapy with a small budget! Below are some of the ideas I’ve used to save money!

1) Save old containers!
Then, go out and buy acetone nail polish. Soak an old rag in acetone nail polish and wrap it around the old container. Leave for ~5 minutes. Then, scrub, scrub, scrub! And voila: you have a plain, white container!
You can use these to store game cards, boardmaker pictures, popsicle sticks, etc... I also love sending these containers home with students! That way, if they never make their way back, I can just clean off another container.

2) If you plan on using a worksheet often, with a small group of kids each time, consider laminating it and using dry erase markers! By doing this, you won't need to print copies for each group! If the dry erase marker sticks, drop a SMALL drop of hand sanitizer on it, and wipe clean with a tissue!

3) Save toilet paper rolls! And paper towel rolls too!
Start with 2 toilet paper rolls. Cut one of them into thirds, and cut a slit down each of those pieces (see picture below).

Wrap each of the smaller pieces around the tube. They can spin around the tube!

This can be adapted for articulation words, reading sight words, phonological awareness activities or phonemic awareness activities!


OR use a paper towel roll for even more options. This can be adapted to match items of the same color, categories, words that start or end or contain an articulation sound, or so many other goals! My students used the roll below to spin each segment and match up all of the words that begin with ‘B’.

Below are other things to do with toilet paper rolls:
Heart Stamping
Toilet Paper Roll Caddy
Toilet Paper Roll Alphabet Crafts
Roll a Word (great for phonological awareness)
Pull Tab Books
Penguin Puppets

4) Save recyclables.
For Sorting: You can sort recyclables you might normally throw away into categories like paper, plastic, glass, or metal. This could be a great functional activity for some of your older students as well! Below are some examples of how easy finding each of these materials might be:
Paper: Any things that print wrong, junk mail, magazines, brochures, cardboard food packaging
Plastic: Water bottles, plastic food containers (sour cream, yogurt) or bottle caps
Glass: Pasta sauce containers or bottled drinks like Snapple
Metal: Caps from bottles like Snapple or cans (food or soda)
For Functional Therapy: See a great post here from Major Speech Pathology Fun by a Minor Girl on how to incorporate business cards and brochures in your speech room!

5) Last, if you have an iPad and purchase products on TpT, try using some of the products on your iPad instead of printing, cutting, and laminating all of the pages! This will not only save you money, but valuable time as well!

I hope some of those ideas helped! If you are interested in seeing more ideas on another great website, click here.
Always take advantage of Goodwill, websites like Teachers Pay Teachers, and dollar bins in Walmart and Target! Stay creative and craft on!

Be sure to head over to Speechy Musings Facebook page and TpT store!
https://www.facebook.com/speechymusingsblog
http://www.teacherspayteachers.com/Store/Speechy-Musings

Thanks everyone!!!
Kristine
Live Love Speech

Friday, February 22, 2013

Warm-up or Wrap-up Articulation Activity!!

I am super excited to share my newest idea with you all!  This can be used in various ways such as a "warm-up" or "wrap-up" activity.

Here is what you need to prepare this activity...

  • Small envelopes or "library" pockets
  • Printed page of numbers 1-10 or 1-20 (3 copies)
  • Basket or hat for one set of numbers
  • Quick articulation activities (e.g. Say your sound 10 times, Say 2 sound words that are things)
How to set up...
  • Print and cut numbers 1-10 or 1-20 (how ever many articulation activities you would like to have).
  • Glue each number to a library pocket or small envelope.
  • Cut the other two copies of numbers apart and place inside a basket or hat.
  • Create and cut apart various articulation activities and place into library pockets.


How to use the "warm-up" or "wrap-up" articulation activity
  • Each session (or once a week) students choose 3 numbers from the basket either at the beginning or the end.
  • According to the numbers chosen, students take an activity from the library pockets.
  • Students take turns completing their chosen activities (e.g. Use a sound word in a question).
This activity is great for a little extra practice AND can be used for carryover (students take home their chosen activities for homework).  Every few weeks, change up the activities that are inside the pockets to keep things interesting!

Hope you all enjoy!!!


Sunday, February 10, 2013

Valentine's Day activities for this week!

As you all know, Valentine's Day is this Thursday!  I love to see the cards students exchange in class and how excited they all get!  I'm sure many of you have seen tons of Valentine's Day themed TpT activities.  Will you be using any this week in your speech room?  I will be using two  of my {FREEBIES}, Valentine's Day Vocabulary Matching and Heart Train of Multiple Meaning Words along with a few other ideas/activities!  A few days ago, I posted about the Valentine's Day speech booklets my students would be making.  Many of my groups worked on the booklets last week and will be finishing up this week.  I love doing little crafts or DIY type activities especially because they can be used as homework/carryover.  

Here is how the Valentine's Day speech booklets have been coming along so far... 

 I love that the students have been practicing writing and saying their speech words, being creative, and having fun with this adorable activity!


Below is a picture of a few other activities we will be doing this week.  My students will be reading/discussing the book, There was an old lady who swallowed a rose!  We will follow it up by using Crazy Speech World's language unit that goes with the book!  

I found this cute "heart" worksheet in a folder that was left by the previous speech therapist.  The idea is to have students color in a piece of the heart each time he/she produces a speech sound correctly.  I am also going to use this with some of my language groups.  For example, if the student answers a "wh" question correctly, he/she will color in a piece.  I love that this worksheet is so versatile! 
Finally, I will be using my two Valentine's Day {FREEBIES}.  You can head over to my TpT store to check out all the details and grab them!


Hope you all can use some of the ideas/activities listed here with your students this week!  
Kristine
Live Love Speech


Thursday, January 31, 2013

Easy and Fun Valentine's Day Booklet/Carryover Activities!

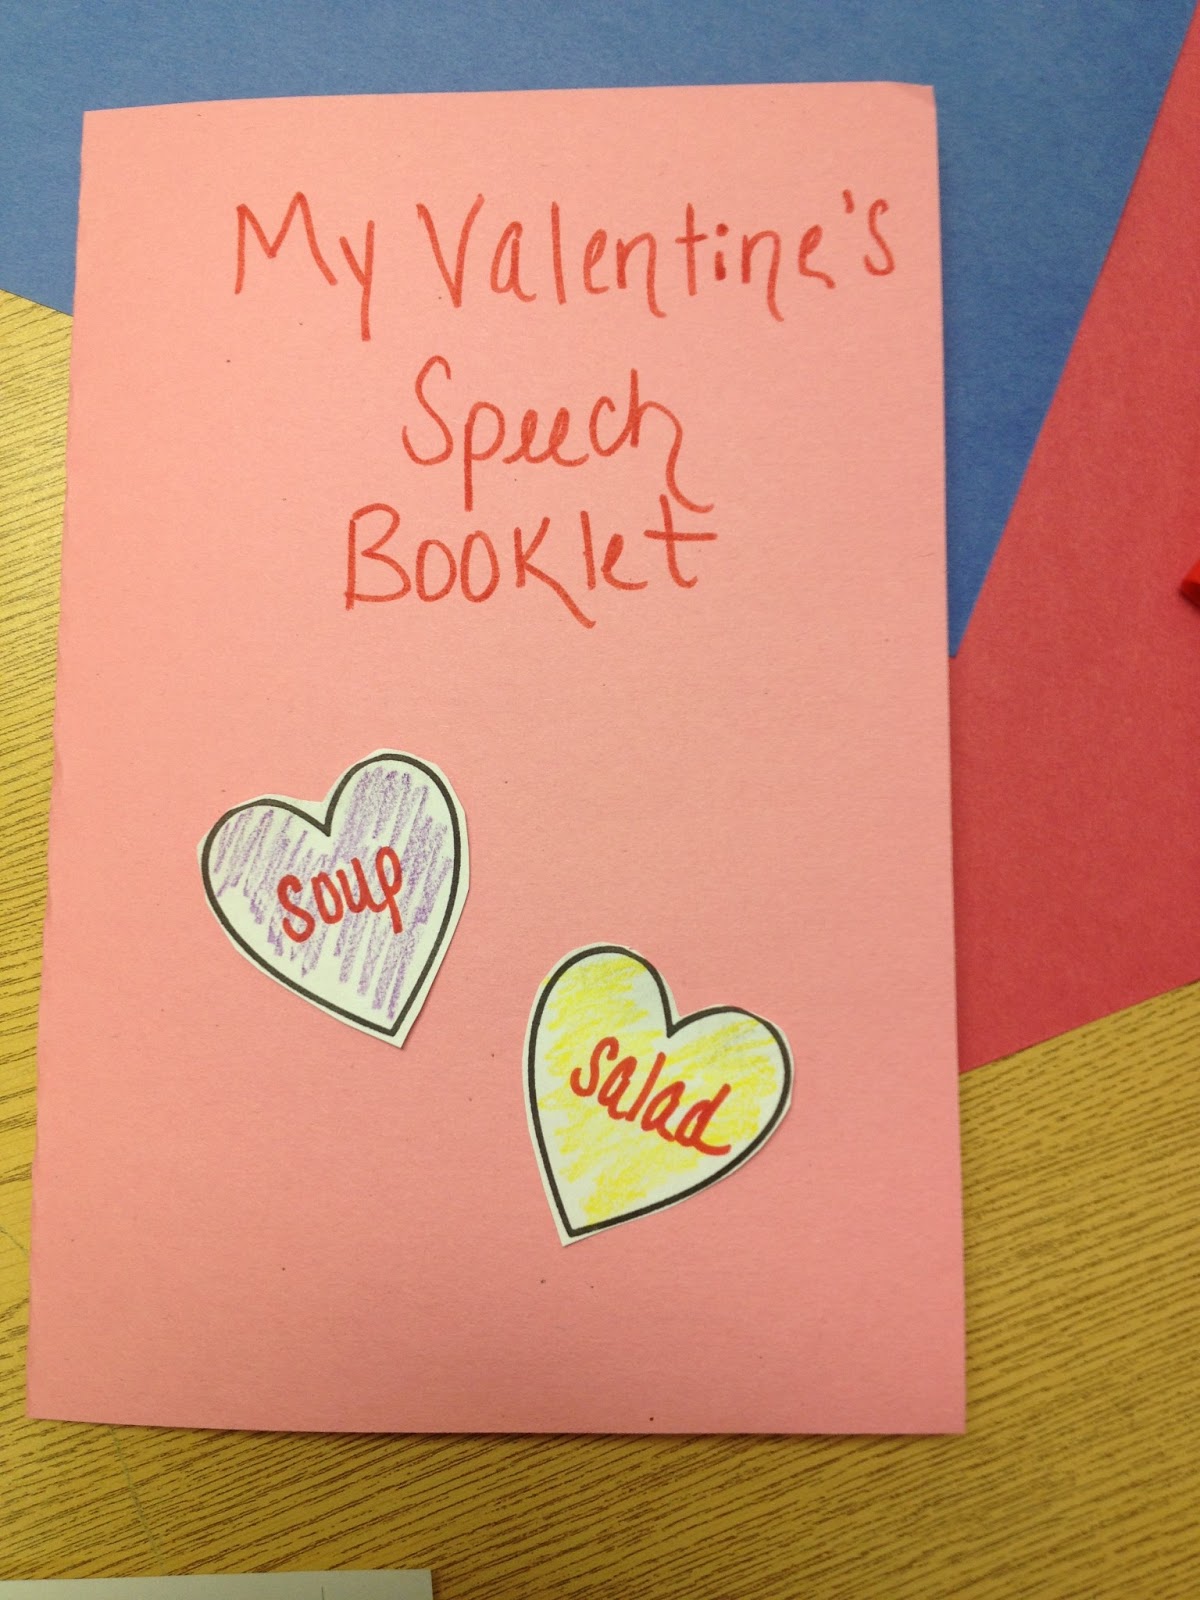
Happy Thursday everyone!!!  I wanted to share my quick, simple, and fun Valentine's Day booklet and carryover activities that I will be using in my speech room next week.  I came up with the ideas to use with my articulation students.  I'm not sure about all of you, but my caseload is 50% ESLS students.  I get very bored with the same board games and activities, so I am constantly trying to come up with new ideas! I will be posting many more pictures next week once I use the activities with my students.  So here we go....

Valentine's Day Articulation Booklet

Each student will get the worksheet with blank hearts, a piece of construction paper (color of his/her choice of course!), and a word/picture list (depending on which speech sound he/she is working on).  I have a lot of craft supplies in my room including markers, crayons, colored pencils, stickers, glitter pens, tissue paper, paint, and more!  
Students will write words from their own articulation lists onto the blank hearts.  They can then color in all the hearts and be creative as they would like!  Next, they will cut out all of the hearts and glue them onto the front, inside, and/or back of their booklet.  As you can see in the picture above, I just labeled my sample booklet as "My Valentine's Speech Booklet".  I will have my students write their names and add their speech goal as well to the front of the booklet.


The best part about this Valentine's Day booklet is it can be taken home to use as practice/homework!  SLPs know how important it is for students to practice, practice, practice!!  

Hope you all enjoy this post and cute idea!  I will be posting more pictures and updates next week once my students make their booklets!

Sunday, January 27, 2013

Using Bubbles in Speech/Language Therapy

I don't know about all of you but one of my students' (past and present) favorite activities is blowing bubbles!  It's a low tech, inexpensive, and fascinating therapy activity.  I have even taken it a step further and had my students create "bubble prints".  There are so many of these ideas on pinterest, blogs, websites, etc.  Here is how I had my PreK students create their very own bubble prints (while working on language/speech development)!


Here is what I used: 5 bottles of bubbles, food coloring, small plastic cups, card stock cut in half, and disposable tin trays.

Preparing and creating bubble prints:  I added drops of food coloring into the bottles of bubbles to create, red, blue, green, purple, and orange.  Each student got a piece of card stock with his/her name on it and a tin tray (to eliminate your table being a mess!).  Students were able to be creative and choose whatever colored bubbles they wanted to make their print.  Before they started we practiced lip rounding, taking deep breaths, and how to blow in order to create a bubble.  Finally, the fun part, blowing the colorful bubbles onto the paper! I allowed the prints to dry over night and then each student was able to his/her home!

I think they came out adorable and look so awesome!


There are so many ideas and ways to use bubbles in therapy (just do a google search!).  I personally have used bubbles with students/children working on /b/ and /p/, lip rounding, and turn taking!  

Heidi at http://mommyspeechtherapy.com explains the use of bubbles to improve language development!  Here are her 10 ways to use bubbles:


1. Use bubbles to promote eye contact.
Engage your child in a fun bubble blowing activity. Watch for the anticipation of more bubbles. Wait for eye contact before you blow more bubbles.
2. Use bubbles to stimulate your child to make a request.
This may be as simple as blowing the bubbles, screwing the lid on tight, and giving them back to your child. Wait to see what they do. If after trying to open the bubbles themselves unsuccessfully, they hand them back to you for help, they have just made a request.
3. Use bubbles to teach a sign.
When your child hands the bubbles back to you to open you can use this opportunity to teach the sign for open.  Or while blowing bubbles for your child you might pause to see if he asks for more. If not, teach the sign for more
. You may also teach the signs for again, want, please, and all done.
4. Use bubbles to teach a sound.
When your child requests for more bubbles with a sign or gesture try modeling the sound /m/ for more
, /b/ for bubbles, or /p/ for pop (pop bubbles).
5. Use bubbles to teach a word.
Use bubble blowing to teach the words, bubbles, more, again, want, pop, all done, fun, please,
 and whatever else you can work into the activity.
6. Use bubbles to teach turn taking.
Bubbles are a fun way to teach my turn, your turn.
 Basic turn taking routines teach kids the skills for conversational turn taking. You may also teach the signs for my turn, your turn during this activity.
7. Use bubbles to teach lip rounding for the sounds /w/, oo, and /o/.
When your child blows bubbles through a wand watch the shape of their lips. If they are round, great! If they are more on the flat side try squeezing their cheeks forward to get their lips in the right position. If this doesn’t work try having them wrap their lips around a wide straw (McDonald’s straws work great) that has been cut to about 2″ in length, then with their lips around the straw have them blow the bubbles through the wand. The straw positions their lips into the correct posture for blowing.
8. Use bubbles to position and strengthen the tongue correctly for the /k/, /g/, and ng sounds.
Blowing exercises such as blowing bubbles position and strengthen the tongue for sounds produced in the back of the mouth.
9. Use bubbles to strengthen abdominal muscles for sustained speech.
Strong abdominal muscles can help increase sentence length. Work with your child to blow consistently longer streams of bubbles each time you practice.
10. Use bubbles because they are fun and kids love them!!!

The article above regarding ways to develop language using bubbles was written by Heidi at http://mommyspeechtherapy.com/?p=38.  


I hope you all enjoyed this post!!

Kristine